In the previous post we explored how to get NanoGPT training on Modal. There was quite a bit to that, so I left the text generation part to now just to cap that post off. Let’s do that now and then try some more stuff out with NanoGPT.
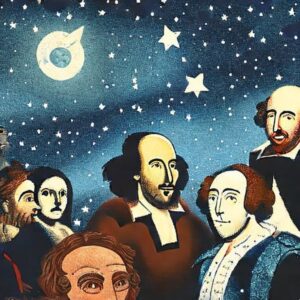
Let’s make some Shakespam
With all the setup work done in the first post, generating text on Modal will be much easier.
The repo code that generates text is sample.py, and we just need a script to hook into that and run in in Modal, which is this (train_modal.py):
import modal

# Make sure we have access to the data we prepared earlier:
volume = modal.NetworkFileSystem.new().persisted("nano-gpt-volume")

# Set up the container for running the training, and make sure it has the necessary
# python pacakages installed.
stub = modal.Stub("nano-gpt-sample",
    image=modal.Image.debian_slim().pip_install(
        ["torch", "numpy", "transformers", "datasets", "tiktoken", "wandb", "tqdm"]
    )
)

# This stub.function allows train_modal to be called remotely on their servers. We will
# now specify how we want that set up...
@stub.function(
        # Ensure that the function runs with a GPU, I have picked out a cheap one, but you can replace
        # this with "any" in the future if this GPU is no longer available.
        gpu=modal.gpu.T4(),

        # Increase the timeout to allow long training times.
        timeout=3600,

        # This tells modal to upload the entire nanogpt package we created. Without doing
        # this it won't be able to locate train.py, model.py etc.
        mounts=[modal.Mount.from_local_python_packages("nanogpt")],

        # Mount the data we prepared earlier
        network_file_systems={"/root/data": volume}
        )
def sample_modal():
    # This import is a cheeky and quick way to run nanogpt with minimal changes to Andrej's code. Ideally we would change
    # the `train`` module to expose a function. Then import `train` and call that function.
    import nanogpt.sample

# This is what gets called locally when running `modal run train_modal.py`, and it just calls the
# remote function.
@stub.local_entrypoint()
def main():
    sample_modal.call()
Then to run it:
modal run sample_modal.pyThe result of this is long, and is shown in the expander below. I think this is really impressive:
Shakespeare Output (click to expand)
ANGELO:
And coward to lay them again.

DUKE VINCENTIO:
My lord,
My lord, I have received. Come, and you not affance,
I have heard to the way of the wanton.

DUKE VINCENTIO:
Once some rove sorrow to prince, you must have a
party husband with a creature her years and we are at lives
to the world that you have done evil so, and your face now
yet to-day, you must pardon not the son; if he must not have
been fair of your own.

KING EDWARD IV:
I am a brief, and that he straight no more stones of the

---------------

Men pardon me, you shall have hang have myself
And fortune's madam, who cause me to my grave,
That could perform the glory to ask of men.

Servant:
Peace, my lord, dispatch, I say you to the state.

First Citizen:
It is Claudio, now she shall content me to do home,
That were but with his grace.

First Servingman:
Nor I had said it, he did not the voice.

Third Citizen:
He is it is no no strength of all the city;
And so the silence lies all of soldiers part.
There is it out to give us your wife.

---------------

MARIANA:
I beseech you, I would were her the compass,
And say your complexions are to be rest;
And in the world-find the veins of this very
Doth like a good sword. You have a man a poison come as
In that lamentation or pleadeness, not of happy part
In antic determy's landers, most lovely speech
To the world a deed of through he is head,
Resolved in closen. What is the law of your taste?

HENRY BOLINGBROKE:
Farewell, and let us my lord: yet I will be foresh,
Believe me as you are so are all to th
---------------

The shortening shall the crown, even I be sudden.

GLOUCESTER:
But when I was before the straight of my death?

QUEEN ELIZABETH:
And if thou deserve mistrust with God!

KING RICHARD III:
Hast thou know'st this sentence may not less?

QUEEN ELIZABETH:
The crowns of thy hand, like all thy courts to see.

KING RICHARD III:
Thou liest; and like a spoil to thy wit should.
Wert thou and a world prize head, and sent my grace
To comfort, a should things bring thy honour,
And a submission that be a happy
---------------

Be every believed him to the crown
For less of Gremio, I means to give us him.

FLORIZEL:
What rade you beseech your tongue.
If my live, we'll be gone, my lord.

CLAUDIO:
Look,
That he not so your trannous company many
Does his noble gentle confession
Procled had done, let us you go your foe
To say advise me which royal provided in his beast.

ISABELLA:
But your mother, the senators of brother party,
Sir, he is in joy and little his head;
The air fearful rob her false for our growther's crown,
Y
---------------


MENENIUS:
He hath had not a scatch'd before him:
Fie, make a grace, but he sword him well
To pluck a town and so at the time;
But what news is he see his beauty love?
What was done? if we will not sit it now,
Respected it come, and you receiver
To stand me the line of your honour grace
And have heard him fair.

ROMEO:
Cry you not inheritate is the prince of heaven,
Which your ladyy contraction will strike him to bring them
From my sovereignty: they are in his heir,
And he is so his arms and spi
---------------

She would be make from thee spirit!--Her, chequence here,
A man thoughts are the place of a sweeter,
Bare from faults: but I come to him,
You do leave the prisoner and raining
Fear him fill old my vault, and save him love.

First Lord:
He shall be some counsel hunt and the morning warrant,
So if the never warrants of your father's most
To fall father's order? Therefore, I perceive
Think there the new to defend, that tears the people.

HASTINGS:
I thank you at xpeals in the while be
All the souls
---------------

lord:
How dost thou tell he is himself? what give me the world?

Third Citizen:
And the master that be a party villain.

Second Citizen:
Here hath he comes at known to use your guarden
how by the own cause.

First Citizen:
He hath peruned but a stronge in earth!

Second Citizen:
He wisdom crave him with your strokes and highness
Have he deserved to your native with his power.

CORIOLANUS:
No more eye than country's purpose a worthy lips.

Second Citizen:
A peace, sir, when you must be dead! who
---------------

See that wretched in the night's care. But if you like, I
leave you shall be true.

LEONTES:
Who's some that made you have scretch'd me to take.

Second Watchman:
Not, how my brother gates that can the day
And I may out wish her and revenge with yourselves. I

First Gentleman:
And he is my present but to your honours.

CATESBY:
As if they gave you here such be the business
With a rude appetitent of my watch mother,
Be relessed in her is a poison.

LADY ANNE:
How fearful is yourself, my gracious
---------------

Her cheeks is a dreadful end; my lady's gracious lord,
And like a bastard to her tyrannous tain,
But if I think, at so so such disposed.

KING RICHARD II:
How! what a woman?

QUEEN ELIZABETH:
My lord, shall I were her no score to me.

QUEEN ELIZABETH:
Go then be a bounty's place-gowen fyriends!

KING RICHARD II:
Then gentle counsel your headship office,
And I shall say therefore and person committent.

KING RICHARD III:
O Bushy, thou hast not speak'd of fair both to thee.
Thou but shalt thou sha
---------------
It amazes me that we can get computers, which are purely logical to do stuff like this at all. For presentive my first computer was an Acorn Electron – 32kb RAM (a millionth of a decent laptop nowadays).
Another reason this is amazing is the step-change that using the transformer model (which is the T in GPT) gives you over other models that are shown in the zero-hero course. It is not just the computing power that does this, but the research into new models that has happened in the last 20 years or so.
Turning up the temperature
Andrej included a temperature setting, which allows you to adjust the “randomness” of the output:
- If set to very close to zero, it will produce the same output each time. This is the output it considers “most likely”.
- If set to 1, it will produce the output with the probabilities it predicts, for example if it decides, based on training, that there is a 80% chance of an o coming next, and 15% chance of a d, then it will produce an o 80% of the time.
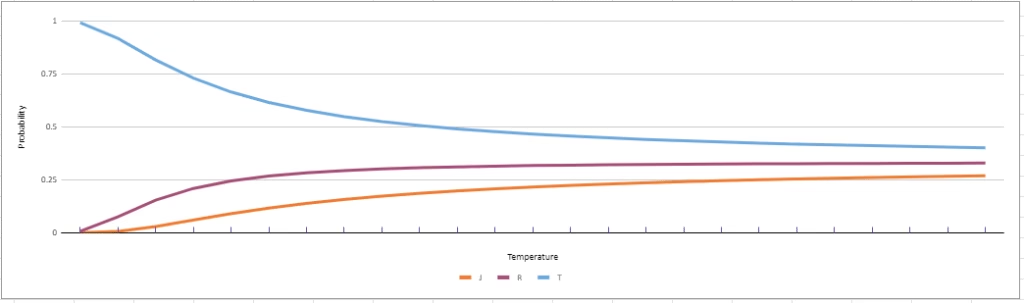
- If set higher, the probabilities will move closer together, giving less likely character more chance of appearing.
The chart below (link to Google sheet) shows how increasing temperature makes the probabilities of 3 potential “next characters” close up to each other, and decreasing causes the preferred outcome to be picked as the winner always:
Let’s try a temperature of 2, add this line to train_shakespeare_char.py:
temperature = 2Here is a small sample of the output I got. It is definitely more chaotic!
HASTINMBSABURY:
Stir-3 Sleep, haugs:
Warthy, usquick..tWarwiXl!
Hatensworn my feans?
You know,
Young, tof it is!
BAmilind!
A low of temperature of 0.1 give us this, which seems more coherent, but much more “stuck like a record”:
CORIOLANUS:
I will be so so much a part of the people,
And then the way of the common of the court,
And then the way of the people of the court,
And the prince of the people of the court,
Which we have stood of the prince of the people,
And the princely of the streets of the state,
Which we have stood to the body of the sea,
I think the default temperature of 0.8 was probably “just right” like the porridge!
Using tiktoken for better encoding of the text
Tiktoken is a tokenizer library used by OpenAI. It’s job is to turn a sentence into a string of number representations, which can then be used to train the model. It does this using an algorithm which first encodes the most frequent words as single tokens, while the less frequent words that contain more frequent words as its subwords are represented by multiple tokens, each of them representing a word part..
Until now. have been training by converting each character to a number. However the problem here is we are not making good use of the structure already in English: words and parts of words to process numbers with more meaning.
Tiktoken offers a choice of the pre-built tokenizers they use in their models, and Andrej uses the gpt2 one. To give an idea of what this does, here is some code that encodes using tiktoken, then shows the resulting encoding
enc = tiktoken.get_encoding("gpt2")
for tok in enc.encode("Alice was beginning to get very tired of sitting by her sister on the bank, and of having nothing to do: once or twice she had peeped into the book her sister was reading, but it had no pictures or conversations in it, 'and what is the use of a book,' thought Alice 'without pictures or conversations?'"):
   print(f'{str(tok).ljust(5)} : {enc.decode([tok])}')
Here is the result:
Click to expand
44484 : Alice
373   :  was
3726  :  beginning
284   :  to
651   :  get
845   :  very
10032 :  tired
286   :  of
5586  :  sitting
416   :  by
607   :  her
6621  :  sister
319   :  on
262   :  the
3331  :  bank
11    : ,
290   :  and
286   :  of
1719  :  having
2147  :  nothing
284   :  to
466   :  do
25    : :
1752  :  once
393   :  or
5403  :  twice
673   :  she
550   :  had
613   :  pe
538   : ep
276   : ed
656   :  into
262   :  the
1492  :  book
607   :  her
6621  :  sister
373   :  was
3555  :  reading
11    : ,
475   :  but
340   :  it
550   :  had
645   :  no
5986  :  pictures
393   :  or
10275 :  conversations
287   :  in
340   :  it
11    : ,
705   :  '
392   : and
644   :  what
318   :  is
262   :  the
779   :  use
286   :  of
257   :  a
1492  :  book
4032  : ,'
1807  :  thought
14862 :  Alice
705   :  '
19419 : without
5986  :  pictures
393   :  or
10275 :  conversations
8348  : ?'
What I find interesting here is "and" & " and" are different tokens: 392 & 290. It is also interesting that most tokens are whole words here. “Peeped” is the odd one out that got split up.
To train the model using the tiktoken we need to run the prepare.py file in the shakespeare folder (as opposed to the shakespeare_char folder we used last time).
Training with the Tiktoken encoding
There are a few things I had to do to get this to work. It got a bit messy, so I won’t share the code here, but I aim to put something better up on Github eventually. But in short I had to
- Change the GPU to A100 – 20Gb to have a chance to train it in a reasonable time
- Because modal has “regions” this means also changing the volume name, so it could create a new volume near that GPU’s region
- And this mean changing all the modal calls to specify the A100 -20Gb GPU so they would be in the same region
- I also changed the parameters, I reduced the batch size from 256 to 64, since the tokens now mean more than they did before, so we can do with fewer, but I increased the embedding size from 384 to 384 * 4 since we might need more dimensions to represent a word.
With all of that done, here are the results I got, there is a lot more text because the number of tokens generated is as before:
Click to expand
RICHARD:
Sir, if you will.
CLIFFORD:
No, by this news.
CLIFF:
I have the duke?
BUCKINGHAM:
The queen, but I'll not answer,
BUCKINGHAM:
So far is she is: I'll tell you well.
CAPULET:
Then, with this?
JULIET:
We are forgot:
My lord,
That is not not a more.
KING RICHARD II:
FRIAR LAURENCE:
But Warwick, noble my heart's son,
And learn thee for afeard.
KING RICHARD III:
POMAS MOWBRAY:
How now,
That thou speak, I should be thy eye,
Call this more as my lord,
That thy good time?
Boy:
No, I will not be done.
QUEEN MARGARET:
But so the duke is this forswear,
Thou canst thou notstst go?
KING RICHARD II:
Well,
Or, my lord, I'll tell thee.
QUEEN ELIZABETH:
My lord, lords, my lord, though I be a life
To your request, by my body or bad.
DUKE VINCENTIO:
At your grace of sorrow and I'll swear
From this is a slave, go, sir, let him be not be so.
LUCIO:
Not much much with him.
DUKE VINCENTIO:
I'll'll not be so,
That you shall be.
DUKE VINCENTIO:
Come, sir, let me be this,
Nor would he:
I have not stay you, sir, my lord?
LUCIO:
Why, madam, in the hour; but I am a
for never will and be sent by that knows you,
That can that you are no man.
ESCALUS:
O, have you.
ISABELLA:
Look ye, I'll give him the queen,
That ever all the city,
Will they see; I am
---------------
Romeo; more a poor gentleman.
FRIAR LAURENCE:
My lord, Warwick, the king,
And, and so, if you did so,
Think what you have been an hour not what?
BUCKINGHAM:
My lord, I pray, my lord,
Which, look yourself to your lords,
I speak or my lord,
I must be a villain's son--
KING RICHARD III:
Not a traitor, and such a wife's wife;
Who now, for, who is the prince blood.
JULIET:
My lord, like Edward's son,
They are a deed were gone.
PETER:
An that it shall never be my son,
Wherein your worship's face, to the cause of this pleasure,
To fight in the rest, with the one that he does approach
To bring my hands
That Henry is my name
Thy mother? Sir and take down
To be too revenure
And yet more, and for, by a righteous justice. This is my son,
Than nature, and never
Which to be in my soul,
To bear his country's daughter's son,
I hate him. So, now how the consul'st, as my friends
Than he might have
The dost he shall live, and in his blood
And the hear him at a burthe;
And he shall hear the earth; and this is the field
When he could not keep me not and make him be but. Look, do I have not for any,
Who ere thou doth not stay:
She is not in him
As when thou that thou hast thou there's deny,
Not yet too worse than a man and comfort
Have no more in such idle by the rest;
Within this means, and thy mind
And any that grieved day and heart'st
As to the people were a corse,
There is the crown of the prince, and with a deal of a
thing by the crown had to his breath.
FRIAR LAURENCE:
Welcome, come, and the cause.
JULIET:
FRIAR LAURENCE:
A night is, I can,
Would you be this?
BUCKINGHAM
---------------
A second arms; she did I have sat home.
CORIOLANUS:
No, my friar,
Whose words, you are true.
COMINIUS:
It is the execution'en is not
As I
would be, and,
AEdidius!
MENENIUS:
I would so, sir.
MENENIUS:
I have worn a good sir.
CORIOLANUS:
I pray you, he you to know him:
Nor I have not long.
All:
COMINIUS:
I'll tell me, and what we will tell him,
I am nor place,
And yet I'll tell your office to my good lord,
To see the queen's answer,
To see him to come, and to him
To-emad,
Unless we may. We'll make them stay away.
BUCKINGHAM:
The grandONay, and I will he'll not be?
Messenger:
You'll not not be gone.
POLIXENES:
No cause, if you be an oathful.
PERDITA:
How now comes, Montague's the city?
CAMILLO:
Tush, the sun; but,
You are too, to be my lord, to be most,
And so I will;
But so would be in her ears.
LEONTES:
AEdet:
You are to be just and my life,
Unless them in them, and,
So now he did have seen him,
How now, I'll not my friends, i' the war,
And to my life be gone; take to have
Are I be this.
ANTIGONUS:
I then, go you, come, sir.
CORIOLANUS:
The cause be your care.
VOLUMNIA:
Go, sir.
MENENIUS:
See, sir.
MARCIUS:
He should you mean with him on,
LADY ANNE:
The people has so past the
land is hanged?
LADY ANNE:
Here's a man.
Citizens:
O, the more of
---------------
LUCIO:
Peace, sir, good lord,
Be it to be your opinion's way: I
What, I'll beseech you, where all you,
That we his wife.
DUKE VINCENTIO:
That you might say the duke is with you.
Provost:
Thou hast, make us keep him for you?
LUCIO:
I would be his friend:
We am I now, not to the poor
wixt it, and lay their
bclaim me again.
ISABELLA:
A:
Gentlemen, madam, and not we must not.
ABHORSON:
I pray, the truth.
Cous my lord, for the other's.
DUKE VINCENTIO:
It will, and yet of good Warwick,
To give the oracle.
ESCALUS:
My lord, with this world is a little great
To the or voice! I could not--
LUCIO:
There may I do; the people
To say 'tis bad. Show you are hanged.
ANGELO:
I am a man, be done.
CLAUDIO:
A day, more true
Of nature's son, or so far
With comfort for his.
DUKE VINCENTIO:
I have made her, and he was no more than well most in the other,
I'll make you
Than I have seen them, and that he doth he rather have,
To the loss of the truth of her.
ISABELLA:
A:
Go, good my lord,
For my lord, my lord,
My lord, I'll tell me.
ANGELO:
Tomewell, farewell:
I'll be but too, if your lip,
Or else be so sent my lord, sir,
AEdage:
Thou art past, then thou liest
For thou art a fawn'd at thy fortune,
Do not put him there?
LEONTES:
Welcome, worthy better
That it be a man;
I will give thee so,
I thank the friar,--
RICHMOND:
An is not a
---------------
GLOUCESTER:
My lord, I'll take it more,
And that it be sworn.
KING EDWARD IV:
My lord, and well I do know
That you have done to use the king,
And love the king may be the king on the king: some other.
To tell him here:
I have been been gone.
KING RICHARD II:
Ay, my lord,
And yet please me, my lord,
That all the king or England's face
My gracious lord, to be satisfied?
CLIFFORD:
Call my lord, our good soul, when I feel,
How dost thou but gone'st not good,
And, in a very day, in my father's death,
Pray thou to have
On him a dish and by me, but of these life.
KING EDWARD IV:
Uncle, and 'tis not, with my soul's head,
Virtue in the benefit of a
more than my soul is valiant--
GLOUCESTER:
Here is a thousand days, I I am strange,
That knows not the more, my lord,
I might have come to thee; so is a
people them the king.
LADY ANNE:
What is't is the gentle's son,
As you have been ill thing to be made,
And, for now he will not, the king is our
That is, by it is with his foot
From all with a good boy.
GLOUCESTER:
O, what you will at your lordship?
LADY ANNE:
I am a man; she's no more fearful
They'll reap the people.
BUCKINGHAM:
They are no more
To use my lord, let me be a
horse it must then, and I can fall
Than a secret fellow.
Citizens:
You have gone to make him you that, I have a
your lords, for it is no better,
Cannot take your goodness and let him be
With every not a loss, by all your wife's love he is gone.
Clown:
My lords!
First Murderer:
Oh, he's.
Third Murderer:
What!
---------------
What news you, that you stood these good.
COMINIUS:
The like you.
Cousin, the time;
Not I did;
The one we must be a great man,
That he may, the war of a noble
To draw the house of the world is amended.
MENENIUS:
Is not I
That'er he had not believe him.
MENENIUS:
Are you deserve to the
man come.
CORIOLANUS:
But call me hence?
VIRGILIA:
O Marcius!
First Murderer:
ANE:
You have been, he did
these sun of our brother's death,
You are no more
As I pray you.
You have been as we have made a drunkenry
With all the wind of a bawme and honour
With all the king, and, I will say
I have heard
I, how I must be
That he sits
He will have thought
To see them, for any doubt; and,
And so we are in my cheeks to our noble man.
VOLUMNIA:
Peace, sir, sir,
Who shows him my lord.
VALERIA:
No, what he did.
MENENIUS:
As Paris is too brief, but that is you,
From this day again, till he shall be gone. They must not go.
COMINIUS:
I'll tell me, be bad.
BALTHASAR:
I'll not your grace he is off
To the
st he does the boar!
LUCIO:
I'll tell you all to speak.
ESCALUS:
I will not give him.
O night, and he is
To the duke I would not be.
LUCIO:
O, my lord! Come, sir, sir, 'twas it?
ESCALUS:
Faith.
ELBOW:
I would not know that I have made us good,
With that you are to my care:
The other that is before the Earl of York.
CLAUDIO:
O, my lord,
That's not my soul.
QUE
---------------
Thou shalt be my good lord, and,
And yet, we must be gone.
Shall be gone:
Nay, good my good wife, thy heart's wife's hence to her husband! Let me be gone.
MENENIUS:
AEdue? Yet;
By our noble uncle, from the good man,
Your suit with the people o'en
To execute my foe, how we did use him.
SICINIUS:
What dost thou didst to the least?
CORIOLANUS:
The sacred noble
report him in the time
Is he had the one that is
be one; and, and not,
If the world be the heavens could.
MARCIUS:
O, fellow you shall you find all
The first will speak him.
SICINIUS:
That often will, O, you shall not not he
But would do it, and
Of this your true? and he's
in the people's wife?
BRUTUS:
Good sir, when he might,
I could be so?
Second Servingman:
I am welcome to the day is the people!
SICINIUS:
Is bad than we are absent to know
With no more.
CORIOLANUS:
I pray, but I know you
Thou art no less a king's head.
SICINIUS:
Even with being a
be a little thing to be it
kand it is hither, he hath it any of. But and so, it is,
For those that are gone with the city.
BRUTUS:
Come to be come!
MENENIUS:
I must but you may be so.
COMINIUS:
O, that it is so.
SICINIUS:
I' the mayor will you.
LADY CAPULET:
Go, sir.
Hath not of my mother, to the rest are,
That you shall not be quickly gone.
JULIET:
Brother, to rise to your highness here.
JULIET:
Good prince, let him be so.
First Citizen:
Why, my lord
---------------
SICINIUS:
O, sir,
And, what is what?
CORIOLANUS:
At the cause of those he
How made't, be satisfied; what we are an evil he is not too.
MENENIUS:
We'll do obey you
Amen, and with a man of care
If you do please you.
A gods here
you was there; then a name, and leave you,
I have all a one.
CORIOLANUS:
If you have been dangerous,
Which it shall not come to tell them yet
Like to be too; here comes the day of the air,
If I had a man so?
MENENIUS:
O, the
fabb'd my friends! the prince
And in all the
news, and you have in the
great man hath given'd a man.
CORIOLANUS:
Not, I'll not be the
day.
CORIOLANUS:
I did not be gone.
MENENIUS:
A god of his pleasure is here.
The very king's
sine, to hold us, being not
with him, with me?
But in the gods I will
My lord, I rather have you, I'll tell him.
CORIOLANUS:
There is it so! he shall be.
MENENIUS:
That you will do deserve.
CORIOLANUS:
Worthy my lord,
You are like a
teest, I am a ballgreat, if you have won'd to thee.
CORIOLANUS:
You shall be made me to give your
to be gone.
MENENIUS:
The one that are about.
MENENIUS:
Your high the way of the people.
CORIOLANUS:
O, how you are no more without
To tell us, sir, the people?
CORIOLANUS:
The people of this doubt till he is so much,
Let me be got.
Second Senator:
No, I'll not kill'd a fearful
Of this is't!
CORIOLANUS:
Go away, that he hath spoke to
---------------
As the queen, but with a glorious man,
And bid it been spent,
To help he can never be drunk.
Page:
What you were a joyful days,
And of all, you must return.
GLOUCESTER:
For honour, if the king's queen?
GLOUCESTER:
I would not never be a poor case.
PRINCE EDWARD:
And, my lord, I am no more
At that the poor king, he is here.
LADY ANNE:
Gentlemen, my lord; and so,
And say, and well thou wilt,
And, by the earth.
LADY ANNE:
I may not be thy blood; my word,
And lay the matter in her, thou art not at all,
But never be too late.
HENRY BOLINGBROKE:
I will keep her.
KING RICHARD II:
O, I'll tell thee to make me speak,
And, this, I see his
me, and all the common
My lord, she is
My lord.
Are I can make you to-day,
Though I have well heard thy brother, O, being the doth not trouble.
QUEEN ELIZABETH:
I'll tell him.
KING RICHARD III:
I'll tell them well.
QUEEN ELIZABETH:
And he did I leave my lord.
KING RICHARD II:
And for my love.
BUCKINGHAM:
The king, poor my lord,
And make my good father, for a man that says I am early upon their best
Of my gracious head, and I thank you.
CLIFFORD:
I have not so so.
QUEEN MARGARET:
But I would tell me, I'll not be satisfied,
How now, with the Duke of York,
And she's gone.
QUEEN MARGARET:
My gracious son, so he did.
GLOUCESTER:
But to thy name, too; and, sir; and to Richmond.
GLOUCESTER:
I hate your grace, my lord,
---------------
Whose my lips, the stroke of God,
And but both be past a devil.
FLORIZEL:
Now, and so place.
HORTENSIO:
POMPEY:
I prithee, madam, my lord,
My name, I have seen it as the more.
CAMILLO:
I'll not be ignorant.
ISABELLA:
HENRY BOLINGBROKE:
Yes, sir, I know the world.
ANGELO:
Give me this remedy, you shall not be with me; make with my
shixt my good lord.
GLOUCESTER:
I am up.
KING EDWARD IV:
Would you go you.
KING EDWARD IV:
Not, for you.
KING EDWARD IV:
The Earl of York, my lord,
And make this good sir, uncle, farewell.
Which he any he makes him.
KING RICHARD III:
Go thou did grant me our fortune's love!
GLOUCESTER:
The queen'st of thy heart shall have been gone.
QUEEN ELIZABETH:
VICINIUS:
From that you may said, I am made the more
At the more that thou not a poor lady's wife
As I'll bite him:
An much in thy noble heart, to be gone,
By my brother,
When I am not satisfied.
CORIOLANUS:
Plantis well when your pleasure.
MENENIUS:
I hope how this is true.
BRUTUS:
These is not the people?
SICINIUS:
The queen is the more, to look them with me.
MENENIUS:
Good princes.
SICINIUS:
AEdile:
Faith, gentle fellow, and it is gone.
MENENIUS:
Besides, what news
To bring him
At our noble man is your grace i' the people
Would free good?
CORIOLANUS:
O, good sir, a poor kingdom,
Which it is no more
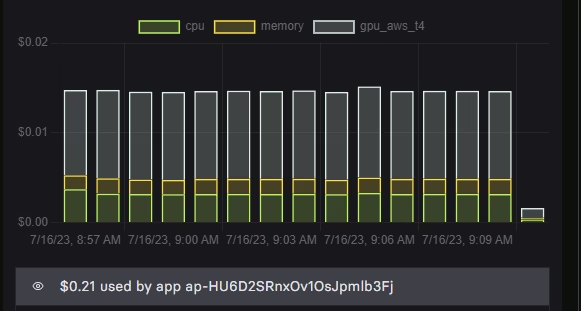
To the people is the sanctuary that I'll have been with you.Training costs were $0.71 for GPU and $0.09 for other stuff. It took almost bang on 1 hour to train. Inference (generating text) took a few seconds.